Translate

Sunday, March 30, 2014

Razor Reveiw: Lord LP1822L (formerly model L6)

The head on this razor is very similar to that on a German-made Merkur. I own a Merkur Classic (model 33C), and can attest that the Lord LP1822L (aka L6) shaves like my Merkur, no doubt, BUT IN FACT, THE L6 IS SLIGHTLY MORE AGGRESSIVE IN CHARACTER. The L6 provides a mild shave that is not overly aggressive but is also not difficult to find the proper angle to cut whiskers well. Since my Merkur 33C cost more than twice this L6, the L6 is obviously a good value. There are important differences, however, that might explain the lower cost of the L6. The Merkur can clearly be an heirloom razor that might provide more than a lifetime of service, while the L6, properly treated (more on that below) may well last years and be passed along, but, again, special treatment may be necessary.
UPDATE: Side view of the LP1822L (above), when compared
to the Merkur 33C (below), shows the LP1822L has a larger
blade-bar gap, smaller blade reveal, but less blade exposure.
The sum of these factors gives a similar shave to the 33C.
UPDATE: Side view of the Merkur 33C.
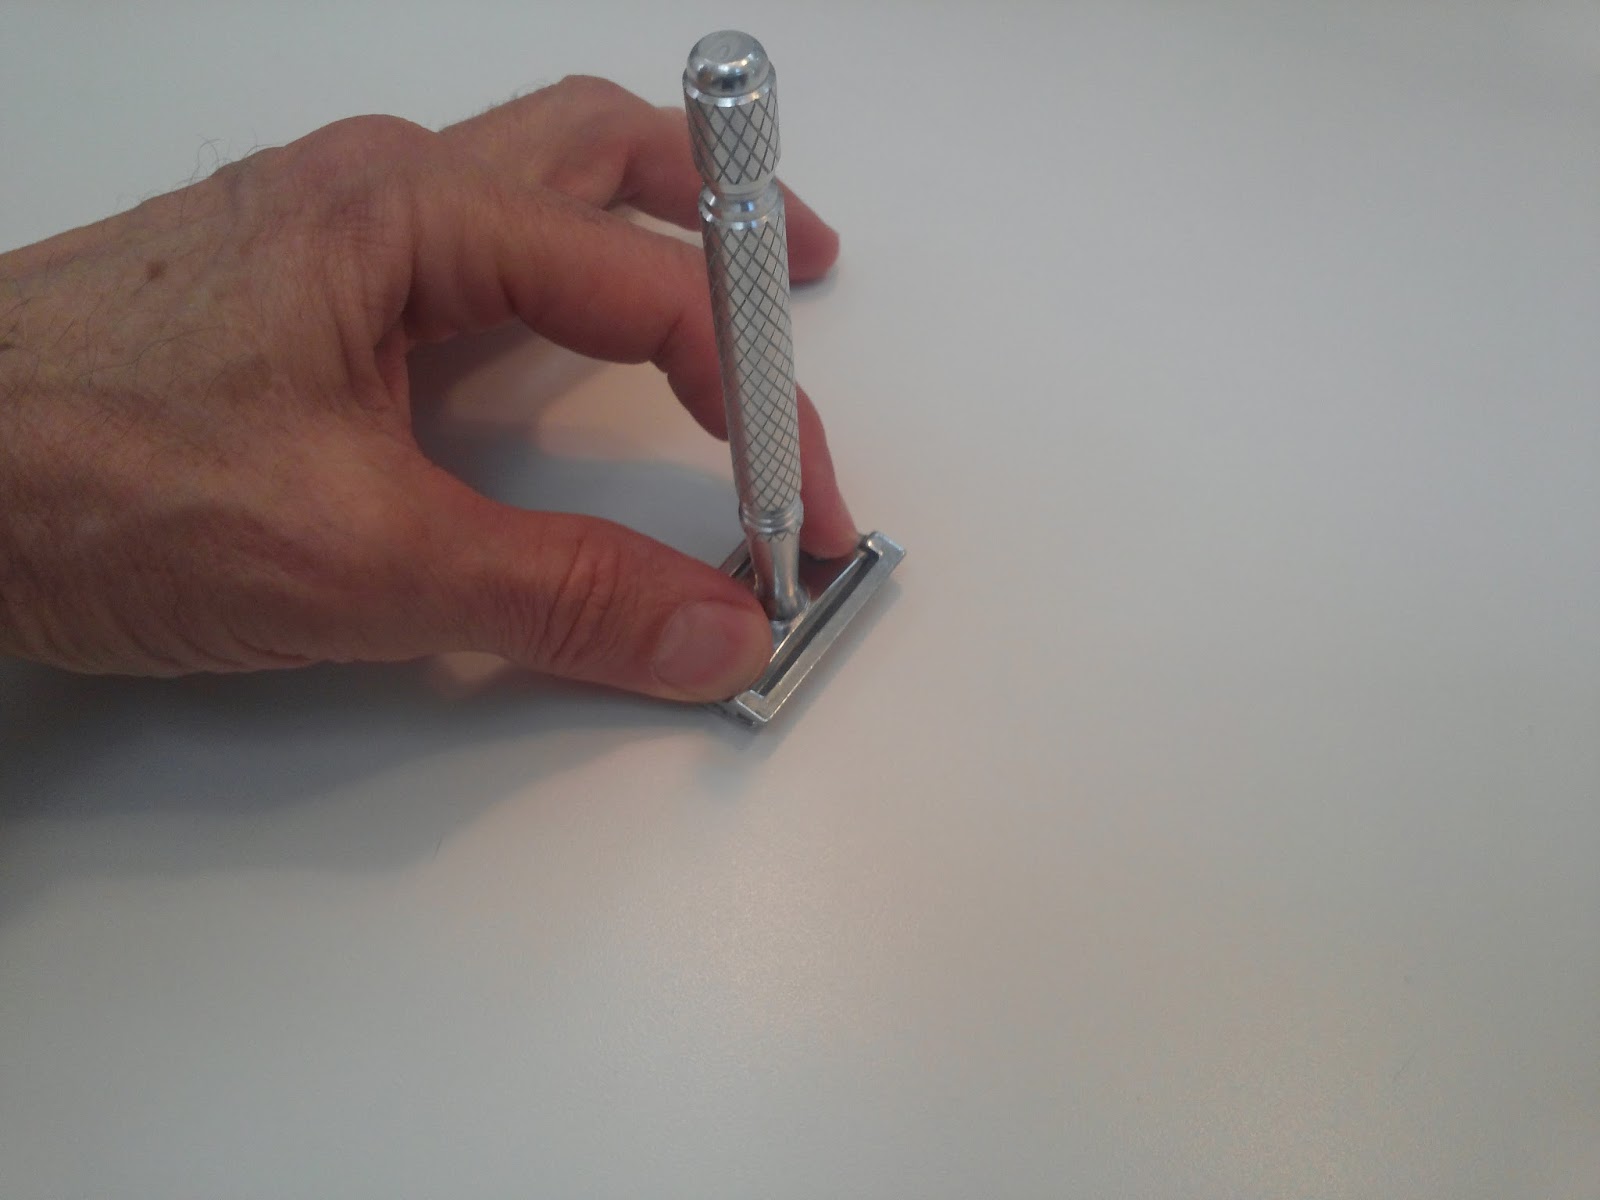
Razor-blade fit: The L6 holds the blade firmly and edge exposure is uniform. This is a good thing.

Lord L6 (left) next to the Merkur Classic (33C)
Handle length and grip: The L6 handle is generously long -- a full one inch longer than the Merkur 33c. Since some complain about the short handle on classic razors, this should make many double-edge (DE) users happy. Since I'm comfortable with the short handle, this longer style has no impact; I find it fine and notice no performance difference whether long or shorter. The criss-crossed diagonal cuts in the L6 handle make a diamond pattern that, though different than classic knurling, makes for a fine grip wet or dry.

Finish: The L6 handle is clearly aluminum and appears unplated, uncoated (it may have some clear coating/anodizing -- I just don't know), while the Merkur is chromed. The head of the L6 appears chromed, and in comparing it to the 33C, the only difference in finish quality that I can see is that on the ends (the narrower sides) of the base and top plates, they don't have a smooth, mirror finish. But if this bothers you a lot, you may have larger issues than getting a good shave at a value price. I, personally, find this minor finish flaw to be inconsequential.

But some other, more important concerns have been raised by others that deserve attention:

1. Insufficient thread interlocking between head and handle: This appears to have been a manufacturing issue that may have been resolved or at least improved. Certainly there is adequate but not generous thread engagement in the razor that I received: about four turns of the handle snugs it to the razor head (not four full revolutions, but four twists of the hand). This is fewer turns to secure than is required on my Merkur 33C -- and the 33C has a steel handle, which will be more durable than the aluminum of the Lord L6. I would suggest buying the razor from a seller with good customer-satisfaction ratings, and if this short-thread issue arises at or near time of delivery to you, you can get a replacement as has been done in the past.

2. Aluminum handle instead of steel: Here is where user care may make the difference. Yep, aluminum doesn't have the strength or toughness of steel. If you cross thread or over tighten, the handle will be toast. Also, the threads may not feel as silky smooth as you turn handle on and off the razor head. To address these issues, I suggest the following:
a) When you first get the razor and periodically thereafter, apply petroleum jelly with a toothpick to the threads of the handle. I do this when I change blades, which is about once per week of continuous use. (I also do this on more expensive razors that have all-steel components.)
While tightening or loosening the handle,
compress the razor head into the counter to take any
unnecessary strain off the handle threading.
b) Tighten carefully. Compress the top and base plates together with your fingers as you tighten and loosen the handle. This takes any strain off the aluminum threads. Then stop tightening as soon as the handle engages the base plate; NO ADDITIONAL FORCE IS NECESSARY!
If you do these things, you will likely get more extended use from this razor.

3. Weight and balance of the razor is respectively less and different than other similar designs because of the aluminum handle. Yes, it's true; my Merkur 33c weighs 57 grams, while the Lord L6 comes in at 44 grams -- roughly 20% lighter. While DE aficionados insist that heavy razors shave better because "the weight does the work," not only do I find this to be untrue in my experience, but also in terms of physics it makes little sense. You shave in all directions: up, down, sideways; and in any case, it isn't gravity that holds the razor against your face -- it's the pressure (hopefully very light) that you apply! (It may be true that the mass of a heavier razor helps keep the blade from bumping over stubble when using extremely light pressure against the face, but I don't believe this comes into play for most shavers with most reasonable-quality razors including this one.)

Find the right blade for you in this razor and you should be a happy shaver. This razor gets four out of five stars because of its shaving performance and its value. The aluminum handle, though generous in length and with adequate grip, may have its threads stripped over time from over tightening or simply constant use. This razor is an excellent purchase as a travel razor over the long haul, or as an every-day razor if you are willing to accept it as something less than a lifetime razor. I feel this purchase was money well spent, and heartily recommend this as a first DE or another option to add to your collection.


Happy shaving!

Monday, March 24, 2014

Second Baby Step Toward Shaving Like Grandad: The Two-Pass Shave

If you're following this sequence of baby steps* toward shaving like Grandad with a double-edge (DE) safety razor, then you've already begun the ecologically-friendly, economical, face-pampering process of lathering with shaving soap (or cream) and a brush as described in a previous article.

With today's step, you still use your normal shaving razor, whether single-blade disposable, or the more common multi-blade, pivoting system.  However, you are likely to get a better shave from your razor than you have before.

The process of the two-pass shave is simple.  Prepare your beard as usual; then lather and shave with the grain of your beard.  Then rinse with warm water.  That is the the first pass.

The second pass involves feeling your face and neck for the spots that were not shaved closely.  Then lather, and shave again -- only this pass will be not with the grain, but rather, across the grain.  That means that in a given section of your beard, if the hair tends to grow downward, then you wouldn't shave with downward strokes (that would be with the grain, a.k.a. WTG), and you wouldn't shave with upward strokes (that would be against the grain, a.k.a. ATG.  Don't shave against the grain at all with your multi-blade device if this is something you don't normally do!  Shaving against the grain of your beard using a multi-blade shaver is a formula for irritation and in-grown hairs!)  Across the grain (XTG) shaving on this patch of downward-growing hair would be defined as shaving with sideways strokes -- strokes parallel to the floor.

When making this second pass, concentrate on getting a close shave in the areas poorly shaved in the first pass.  This doesn't mean pressing the razor harder against your face.  It means manipulating the skin with your free hand to make it tighter or flatter, moving your jaw, using your tongue or puffing air in your cheeks to get a better skin surface for the razor system to shave more effectively.

If you've never done a multiple-pass wet shave before, once you try it you will likely find that you're now getting a closer shave without any additional irritation.

Next baby steps:  If you are taking these baby steps to completion, now might be the time to acquire your first DE  razor.  Some good first-DE-razor choices to consider are the following:

  • Merkur 33C Classic:  A 3-piece design available for under $35 and can ship from North America -- meaning reasonable delivery time.  Gives a nice shave. This one can become an heirloom if used with care.
  • Lord  LP1822L (formerly the model L6):  A lower-cost knock off on the Merkur 33C.  Same head design and shape.  Little lighter weight.  Longer handle. Same good, mild shave.  Can also be shipped from North America. Probably less durable than the Merkur; unlikely to become an heirloom. Can be had for under $15.  
  • Wilkinson Sword Classic DE razor:  Mostly plastic and low cost but not necessary a bad buy.  Nice weight, non-aggressive blade exposure & angle.  (Comes with a pack of Wilkinson blades, but I, personally, don't care for most uncoated stainless blades such as the Wilkinson Sword blades that come with this razor; I find them to give a harsh shave out of the package.)  This razor can be gotten for under $12, but it ships from Europe, so it takes a little longer.
  • Weishi 9306-f:  This is the only twist-to-open (TTO, a.k.a. butterfly) design of the group. Sellers can be found in North America.  (Shipping from China takes longer, of course.) Again, like the Wilkinson, be careful with included blades -- especially Chinese brands. Note that this razor is the only one of this group that I haven't yet used;  I'm waiting for mine to arrive. However, from the credible reviews on the Internet (there are many other, non-credible reviewers who obviously don't know what they're talking about), it may be a good first-DE choice. Can be purchased for less than $12.
Be aware that choice of blade is important and, for sure, not all DE blades are equally sharp or smooth.  It is the razor-&-blade combination (as well as your technique) that determines your quality of DE shave.

Important:  Before you use any new DE razor (or any new razor of any kind, for that matter), be sure to carefully inspect for curved or wavy blade and other potential problems.  See this article for more details.

I will be posting reviews of these razors and more in the near future. 


*These baby steps are inspired by similar thoughts that originated in the blog, bruceonshaving.com, which comes to the Internet from Great Britain.

Saturday, March 22, 2014

Inspecting and Testing a New Safety Razor for Subtle But Significant Defects

Many new double-edge (DE) safety razor users will get a new, often very inexpensive DE razor from an Internet seller.  Others will get a hand-me-down razor from a relative, or even purchase a vintage razor from a garage sale, estate sale, or from an on-line auction.

If second hand, they may take the time to clean and sterilize the razor (recommended).  In any case, the next step is generally putting a blade in the unit, lathering up, and giving it a go.

This is too often a mistake.

This explains why many Internet reviews of new DE razors are so polar;  that is, some of the reviewers will praise a given razor for giving a comfortable, close shave, while others will excoriate the razor for leaving them nicked, cut, and bleeding.

The root of the mistake mentioned above (and the contradictory reviews) is in one of three likely sources:

1)  The inexpensive razors sometimes come with a poor-quality blade.  Often, if the brand is not readily recognizable from the copious discussion on the Internet, the blade should probably be ignored and one should shave with a known name brand.  Even the generic drug-store DE blades are usually better. (Remember, however, blade preference is very personal.  The very best shaves with a given razor will be with a blade you have to find through trial and error.)

2)  The user has no DE shaving experience, and approaches his first DE shave as though he were using a multi-bladed-system razor.  (Though expensive and often giving just a mediocre shave, they are zip-zap fast: no skill or prior knowledge necessary.  For a DE shave, better is to first watch some DE how-to videos;  mantic59, the Sharpologist, has some good ones on YouTube as do several others.)

3) The razor is defective -- either from poor manufacturing quality control, or because it is damaged from being dropped or otherwise mishandled.  This third root issue is the subject of this article.

A DE razor that is new to you should be carefully inspected before use.  Here's the how and why (and all this assumes that you bought a straight-bar, not a slant-bar DE safety razor):

Cheap new razors may be durable over time or not;  that's a risk of buying cheap.  A bigger risk is to your skin in that the razor's blade edges are not straight, the safety bars (between the blade and the handle) are not parallel to the blade edges, or both.  It's also crucial to ensure that the blade edge is within the protective envelope of the safety bar.  Without such proper orientations, it can be pretty much guaranteed that the razor will give a harsh, uncomfortable shave at best, and may make you much more susceptible to unnecessary nicks an cuts -- even with good shaving technique and practices.

Two quick stories on this score:
My '63 Gillette Slim Adjustable (the same model with which
James Bond shaved in the movie, Goldfinger)

1) I acquired my dad's lovely 1963 (year of manufacture -- from the date code, I-1, stamped under the head) Gillette Slim Adjustable DE -- acknowledged by most to be a fine razor. It's made of brass with nickel plating, and has the ability to adjust closeness of shave with a twist of the handle (not an essential feature, but a nice one), and it's the TTO (twist to open), butterfly-door design.  Yet apparently at some time in the past, someone probably dropped the razor, because the safety bar had a subtle bend under one of the blade corners, which can result in uneven performance including harshness and nicks.

2) I bought an inexpensive, all-aluminum, TTO  razor from China (not adjustable) -- just to try it out for recommendation to others or to use as a travel razor because it's light and cheap. This one was a generic look-alike for the vintage Gillette Super Speed razors. At a glance, the razor looked beautiful, and the TTO mechanism seemed to work fine.  Closer inspection (a much closer inspection!) revealed that the butterfly doors on the razor were made and assembled imperfectly such that they caused the razor-blade edges to be warped out of shape when the razor was closed up for shaving.  Both edges had an undesirable curve (they are supposed to be straight!);  one edge was higher (farther from the safety bar) in the middle, and lower on the ends;  the other edge of the blade was low in the middle and high on the ends!  A guaranteed harsh, uncomfortable shave at best.  (Fortunately, the seller is reputable, and I'm waiting for the replacement razor to arrive, and will give this one another close inspection!  Update:  it arrived and was better, but one edge still had a slight curve. See my review here.)

To check a DE safety razor for safety, you need to check a few details up close, so if your near vision isn't clear, pull out the magnifying glass, your reading glasses, or the magnifying goggles you use for work or hobbies.  Now here are the details to inspect:

1) Before you put a blade in the razor, assemble (for a two- or three-piece razor) or close it (TTO design) and inspect by eye and by feel the shaving surfaces.  These shaving surfaces are the safety bar and the straight, outside edges of the top -- that is, the surfaces that will rub against your face while shaving -- for any roughness or sharp burrs.  If present, these might be smoothed with a kitchen scouring pad, fine sandpaper, or a fine file or emery board, depending on what is actually needed.  This corrective action is likely to affect the finish, so choose your actions carefully.
Pic 1.  Lord brand, model L6, 3-piece design (not TTO),
with no blade.

Pic 2.  The Lord L6 again, no blade.
2) Inspect the gaps between the safety bars and the razor top/butterfly-doors.  (Pic 1)  The gap should be even and the same on both sides.  You can also check this gap (and the straightness of the top and safety bars) by sighting down the side of the razor. (Pic 2) If the gap is uniform, this means that the outside edges of the top or butterfly doors are straight, the safety bars are straight as well, and both top and safety bars are parallel to each other.

3) Mount a blade (any blade, quality doesn't matter; you won't be shaving now) in the razor.  Before you close it up, check to see if the blade wobbles on the center posts or center tab.  It should fit with little movement prior to being closed up for shaving.  Too much movement means that the razor could be closed with the blade edges not parallel to the safety bars, and you would have to eyeball the alignment to try to get the blade aligned properly every time you open and close the razor.  Or worse, it might misalign and you don't notice, which could give you an ugly shave.  So obviously too much play in the blade alignment prior to buttoning it up for shaving is not a good thing.

Pic 3.  The Merkur 33C, with blade.
Then close up the razor with the blade in and repeat step 2 above.  (Pics 3 & 4.)  In addition to those simple tests, you should hold the razor in front of you, handle down, a cutting edge facing you.  Then rotate the handle toward you, tipping the razor back a little. (Pic 5.) This will visually close the gap between the safety bar and the cutting edge of the blade. You should reach a point where the safety bar and the blade align with no visible gap.  If this occurs on both sides of the razor, you can be fairly confident that the blade edges are straight and parallel with the safety bar, which will help ensure a comfortable shave as long as there is no pilot error.  Do this inspection for both cutting edges of the razor.
Pic 4.  Merkur again, with blade, sighting along blade edge.

4) Finally, inspect the razor by looking straight at the top (no pic shown);  the handle should be pointing away from you, hidden from view by the top of the razor.  Look at both blade edges for exposure in relation to the top and safety bars.  Both blade edges should have the same, uniform, parallel reveal in relation to the top and safety bars.

Pic 5.  Merkur again.
Checking blade edge alignment with safety bar.
If you find defects, there are possible remedies.  A new razor should probably be returned to the seller for replacement or refund.  (A new razor with a defect doesn't mean that they all will be flawed, so you might consider at least one replacement try.)  A used razor can sometimes be repaired.  Search the Internet for solutions.  My family-heirloom razor, the Gillette Slim Adjustable, had a slightly-bent, slightly-out-of-alignment safety bar, as I said.  I found the repair procedure for that at this URL.

It actually took longer to find the procedure and find the best tool (a flat screwdriver, actually) than to complete the repair.

So good luck with your new razor.  If you follow these inspection steps before use, you are much more likely to enjoy that first shave.  

Thursday, March 20, 2014

The First Baby Step toward Shaving Like Grandad: Ditch the Canned Goo, Keep Your Normal Razor

I think for many shavers, the idea of using a double-edge (DE) safety razor is threatening.  It's unfamiliar, alien even, and, after all, it's logical to believe that if it were all that good, DE razors and other gear would be available everywhere just like the multi-blade gizmos are.

The funny fact is:  most of the world still shaves with DE razors.  They are effective (you can get a great shave, but the technique is a little different than with the multi-blade systems) and efficient (meaning cost effective with little waste). We don't see them in our stores, however, because selling DE gear is WAY LESS PROFITABLE for the manufacturers and sellers than selling the high-priced, multi-bladed systems. To get almost any reasonably good DE razor and quality blades, you have to purchase via the Internet, wait a little, and have the stuff delivered to your door. There is a huge variety of choices of shave soaps, creams, other pre-shave preparations, brushes, razors (that hold the blade), and blades themselves. To keep it simple, we'll start with inexpensive basics and let you carry on from there as you choose.

Van Der Hagen boar brush, Target cereal bowl,
and Van Der Hagen soap puck with left-over, drying foam
from my morning shave.
If you get an itch to just stick your toe in the refreshing waters of old-school DE shaving, maybe you would consider just setting aside the can of foam or gel, and make a shaving lather the way Grandad did. You can still use your current bladed device.  For many persons in the U.S., the items needed to lather up for a shave with bowl and brush can still be purchased locally.  Many drug stores still stock the old standby of shaving soaps, Williams.  It shouldn't cost more than $.99.  The Van Der Hagen brand of shaving soap is also available at some stores, and its puck is slightly larger than Williams and can be had as of this writing for $1.69 or so. The Williams brand is fine -- I use it, and like it -- but I think the Van Der Hagen is just a bit creamier, and I use that too.

[UPDATE: Since the preceding was written, I have come to believe that the best value in shave soap, considering both price and performance, is the Arko brand shave stick. If you use a shave stick, you can rub the soap stick directly on your wet beard and then use the damp brush to face lather; you don't need a separate lathering bowl.]

Shaving brushes are also often available locally. Fewer drug stores will carry a shaving brush, but some do. A common brand available in my region (Michigan) is a boar-bristled brush with the Van Der Hagen brand, and this should cost about $6 more or less. The last item needed is a mug or bowl to hold the shaving soap while you load the soap onto the brush. Most will be tempted to get a mug, and you can use any mug that will accept the diameter of the soap puck; this will certainly work. However, I prefer a bowl over a mug.

I like a bowl because it gives me more options.  Let me explain:

It's hard to swirl a shaving brush in a small mug and make a proper, moist, thick, firm lather.  It is much more easily done in a small bowl.  So if you use a small, flat-bottomed mug such as a coffee cup, you can swirl your wet brush around and load it up with soap, then either swirl the bristles in your hand (the one not holding the brush -- this is called hand lathering) or directly on your face (called face lathering).  I, personally, think that hand lathering is too messy, and face lathering, alone, doesn't get a luxurious lather with the inexpensive soaps I'm suggesting as a starter.  I prefer work the lather onto my face after it's already a high quality foam in my bowl.  Hence, I recommend a bowl.  Because I'm thrifty, I don't really get too fancy with things like this, and I shop for cheap and durable.  I found a good plastic bowl for this task at my local Target store.  It's five inches in diameter and two inches deep.  It is sold in sets of two bowls for $.99 -- yep, 99 cents for two.

Now a bowl like this will be bigger in diameter than any soap puck, so with many soap pucks, you can soften a side by soaking in water, then press the puck firmly down into the bowl center, pour off the water, and let dry overnight.  They will often stick in place after that (the flat side of the Van Der Hagen soap does).  The Williams soap is a harder formulation from the factory, however, has a depression molded into both sides of the puck, and even after being stuck down overnight, it will slide loose and get in the way when you start to make lather in the bowl.  The solution is to take a bit of coarse sand paper and rough up the center of the plastic-bowl bottom before you use it the first time. This will give a hard soap like the Williams brand a better surface to grab onto, and it works like a charm. Soften the puck with water, press it into the roughened bowl bottom, pour off excess water, let it dry overnight, and it will stay put.

When you go to shave with brush and bowl to make lather, here are the following steps:
  1. Remember that it is water that lubricates the shave.  The lather is just to help keep the moisture where it belongs.  So...
  2. Make sure your beard (or whatever you're shaving) is well wetted -- ideally with warm water, which can help to soften the hair and make it easier to slice with your blade of choice.
  3. Thoroughly wet your brush with warm water.
  4. Add warm water to the soap puck to soften it.  (This is especially true with a new puck of Williams shaving soap.  After a puck has been used a few times, I find that just a warm, wet brush will do the trick.  For the first couple of uses of the Williams, filling the bowl with warm water and letting it sit for a few minutes, then pouring the water off when you're ready to lather up -- that really does the trick!)
  5. Swirl the brush on top of the puck for a 15 seconds or so to load the bristles with soap.
  6. Swirl the brush around inside the bowl for a minute or two, reversing direction every couple of revolutions.  If you have the right amount of water, you will soon develop a thick, rich lather that will retain peaks almost like whipped cream. (If you're using a mug for your shaving soap, then swirl the soap-loaded brush in your cupped hand, or directly on your face, to make a thick, moist foam.)
  7. You will likely find that some of the richest lather is actually in the brush itself, and this can be squeezed out by hand as desired.
  8. Use the brush to massage the lather into your beard.  This action serves to further moisten the beard and perhaps helps to slightly exfoliate as well as lift stubble as much as possible.
  9. Use the brush to smooth the lather on your face to an even, thin, but opaque layer.  (You don't need mounds of lather; just enough to help retain moisture.)
    (When you're done shaving, excess lather in the brush can be gently massaged back into the bowl.  It will dry and make a great starter lather for your next shave.)
Then shave with razor (or razor system) of your choice.  By the way, you can add steps to the preparation ritual.  Many advocate a nice hot shower before shaving.  Others use a hot, wet towel on the beard.  Some, with sensitive skin, apply a shave oil (you can buy it or make your own) after the face is moist and just before applying lather.  The sky is the limit.  Experiment over time and find what you prefer. Enjoy the ritual.  With the steps above, I've just given you the basics.  Good shaving!

Wednesday, March 19, 2014

How Grandad Shaved

Grandad didn't spend a lot of money on shaving.  He invested a modest amount in some basic tools of the endeavor, and then spent pennies after that for the remainder of his days.

When Grandad shaved, he didn't create a lot of waste to be thrown away.

When Grandad shaved, he initially took a few weeks to learn the skills to get a good, quick shave when he was rushed, and a great, baby-bottom-smooth shave when he could take his time.

The basic tools of DE safety-razor shaving.
Those old-school shavers (from our perspective today) used a then-new device called a double-edge (DE) safety razor. The first DE razors (c. 1903) [UPDATE: the first, modern, Gillette DE razors] had three pieces: a handle that screwed on and off the head, which itself was in two pieces:  the top and the base plate.  The fourth essential component was the slim, double-edged, disposable blade, which was sandwiched between the top and the base plate, then the handle was screwed onto the head.  The year 1934 saw the introduction of the first so-called butterfly-opening top, also known as the twist-to-open (TTO) design, which used the same disposable blades, but didn't need to be disassembled into its major pieces to change blades.

Grandad's father (prior to c. 1903) had no choice but to 1) go unshaven, 2) get his shave from a barber, or 3) use his own straight razor, which was (and still is) an exposed, scalpel-sharp blade with a pivoting, attached handle that could cover the razor's edge when not in use.  [UPDATE: He also had a fourth choice: use an early safety razor, which had their own set of problems that were mostly solved with King Gillette's game-changing innovation just after the turn of the century.] In the early 1900s, if your Grandad was something of an anachronist, he may have passed on the new-fangled safety razor and continued to use his straight edge, with its requisite leather strop to polish the edge between uses.  Using a straight razor is a real skill that many men never mastered (though most professional barbers are required to), which accounted for the popularity of the Gillette safety razor with disposable blades, when that was finally introduced.

Today, though unrecognized by most in the west, the majority of men in the world still shave with a DE safety razor.  However, in the more affluent countries since 1971 (when the first two-bladed-cartridge razor was introduced), the major companies that produce razors and blades have worked assiduously to displace Grandad's shaving tools on store shelves with patentable, highly-profitable, expensive, fully-disposable products, which offer no better shaves than Grandad got.  They have also succeeded in making many men (and women, who use razors to remove body hair) ridiculously afraid of the simple DE safety razor.  (The safety razor does need a lighter touch and initially a slower stroke, which can be mastered in a couple of weeks.  There are many good how-to videos on YouTube;  some of the most recommended are by mantic59, who has his own YouTube channel.)

When Grandad lathered his face in preparation for shaving, he didn't use foam or gel from a can.  (The first cans of pressurized shaving foam were available in 1949.)  No, Grandad had a shaving brush made of some natural animal hair (today, synthetic bristles are available too), a puck of shaving soap, a bowl or a mug, and water.  He would wet the brush, swirl it on the soap puck, and then swirl directly on his face, in his hand, or in a bowl to make a rich lather.  When applied to a wet face, this lather helps hold water, the primary lubricant for a wet shave, against the skin as one shaves.

Many converts to DE shaving find the ritual of shaving like Grandad to be a rewarding one.  It can save you money in the long run.  In fact, the initial cost of getting started, razor, blades, brush, bowl, and soap, can be less that a package of the latest multi-blade gizmos on the rack.  The activity is Earth friendly as well.  Blades are steel, and though disposable, may be recyclable in your area.  (I slide mine into a tin can with a slot, which can then be recycled, if possible, when it is full, which may take five to ten years!)  There is no plastic cartridge, razor or empty foam/gel can to dump into the landfill forever.  The paper and cardboard packaging from my blades and shaving soap is recyclable.  Unlike multi-blade systems, DE razors almost never clog which hair and lather.  Most importantly, it's a simple skill that is fun to learn and practice. Since getting back to DE shaving, I actually look forward to my morning shave!

If you don't want to get started full bore right away, maybe you can take a small step toward lower cost, lower waste shaving.  More to come on that one.  Happy shaving!